
After waiting and waiting for Fastershire (Gloucestershire’s BDUK arm) to finally roll out super-fast broadband to my area, it was finally confirmed that we would not be receiving mere FTTC from BT, but in fact full FTTH from Gigaclear!
The Gigaclear order was placed all the way back in December 2015, before any of the work had even started. Then in June of this year, Gigaclear’s contractors began to dig up the side of the road to lay the fibre cabling. Finally, at the end of August, we received this package through the post:

Gigaclear’s self installation kit
The self install kit can be ordered with different cable lengths, ranging from 10 to 50 metres. You can also request even longer lengths up to 100m, but they will charge you for this. Since Gigaclear only bring the fibre cable up to the boundary of your property, they supply the remaining cable for you to bring it into your house.
The pricing options for Gigaclear are not cheap. You have to consider that you are receiving a premium internet connection, and I feel the price reflects this. On top of the monthly price plan, they charge a flat £100 ‘connection fee’ that is mandatory, and then if you don’t choose self install, the installation fee ‘starts from’ £95. So potentially before you’ve even got your internet connection, you’ve spent £200. Most practical people should be able to easily install the service without paying for the installation fee, however, as we did.
The monthly price plans are as follows (all speeds are symmetric):
50 Mbps – £39.90
100 Mbps – £45.25
200 Mbps – £52.45
1 Gbps – £74.00
I opted for the 100 Mbps plan, since it’s fast enough for pretty much everything. A 50 Mbps connection could become limited in the future with 4K video streaming, for example.
Anyway, back to the installation. Within the installation box you receive quite a lot:
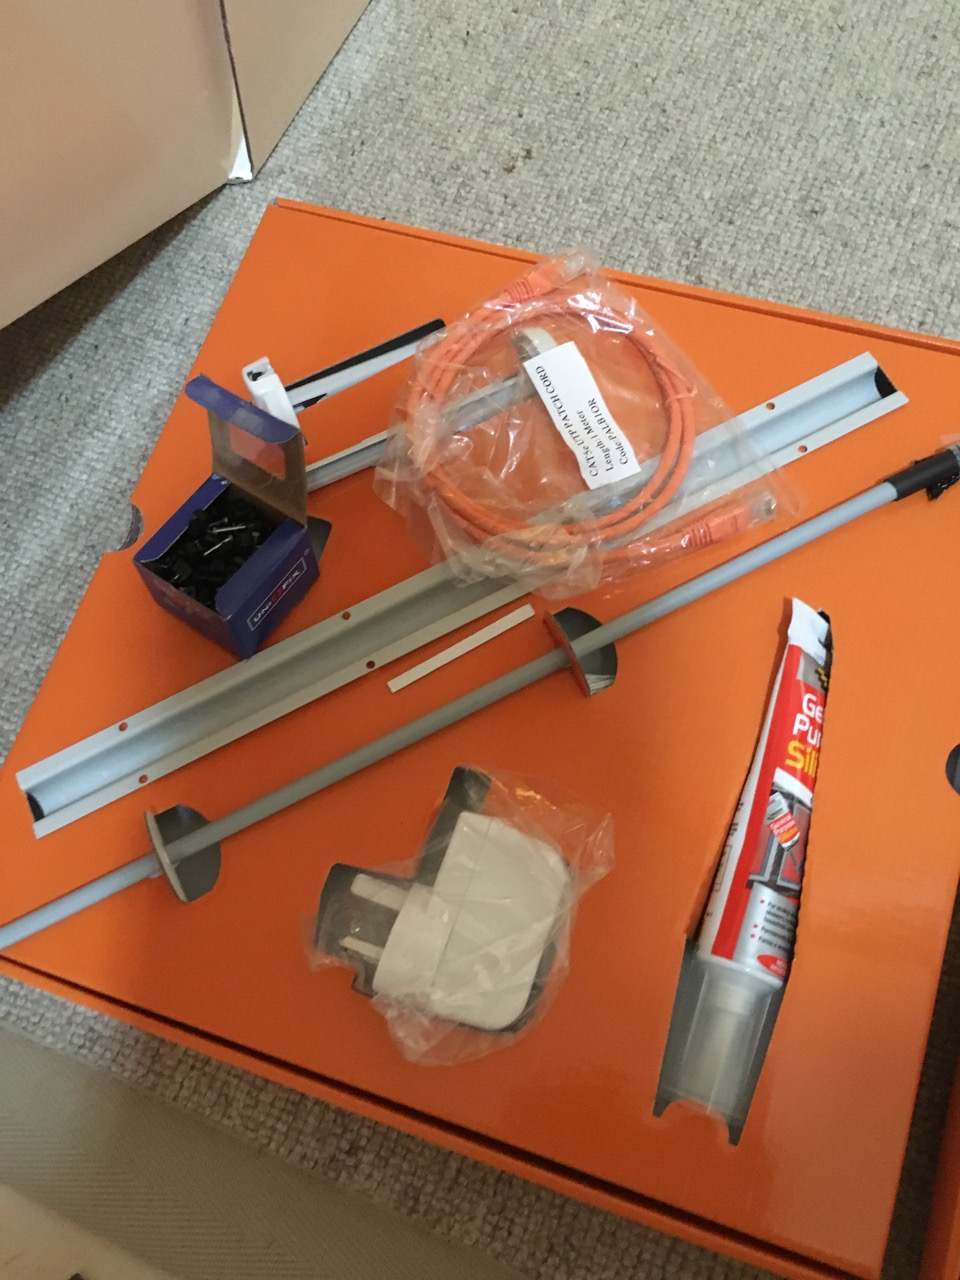
Power supply, ethernet cable, 2 wall entry points, an external cable duct, cable ‘pusher’, silicon sealant, and 100 cable clips.
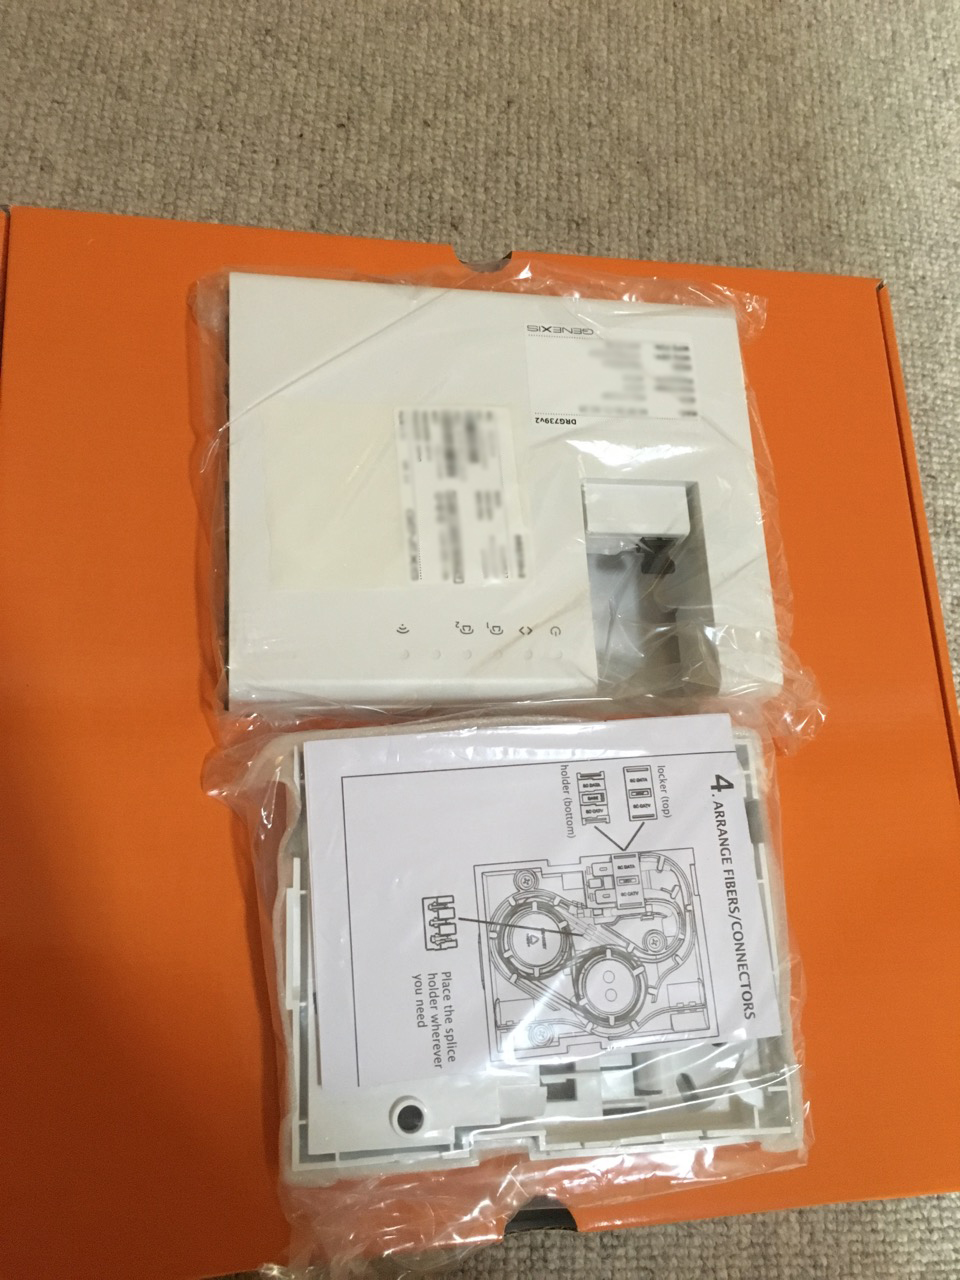
Router and internal wall box
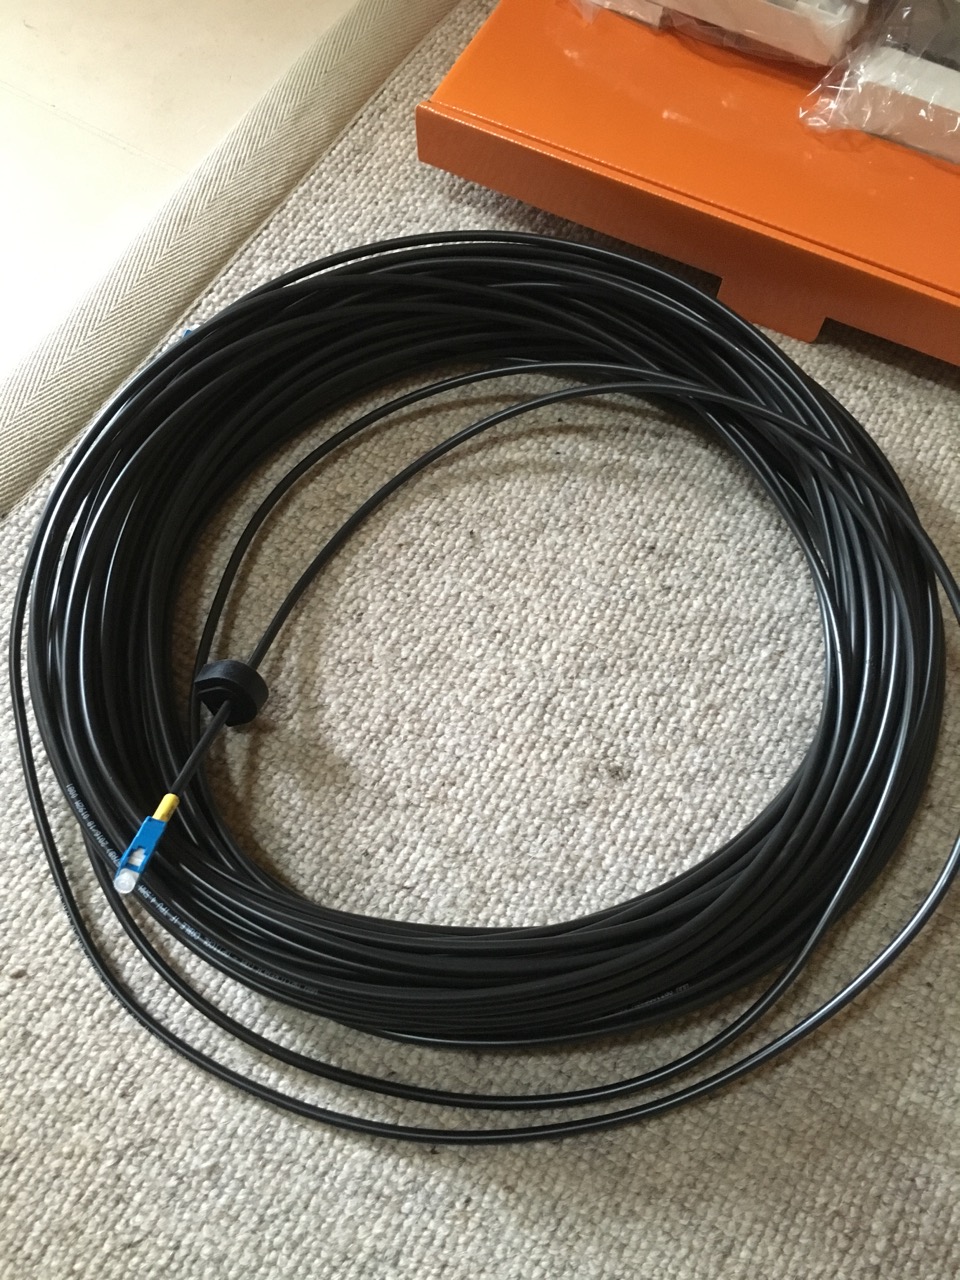
50m of pre-ended Fibre cable
There are fairly comprehensive instructions that come with the box, and at no point during the installation was anything unclear.
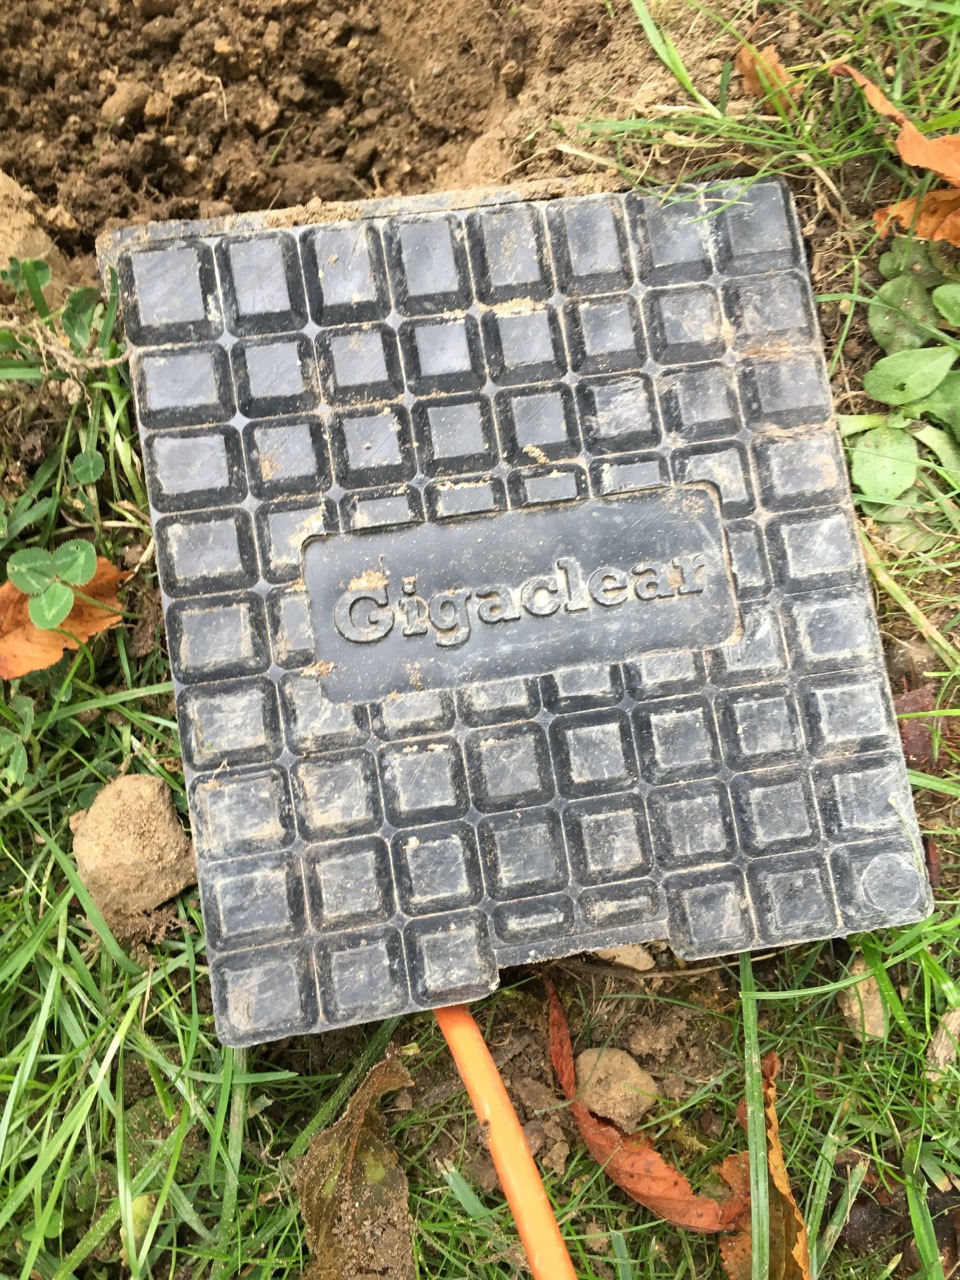
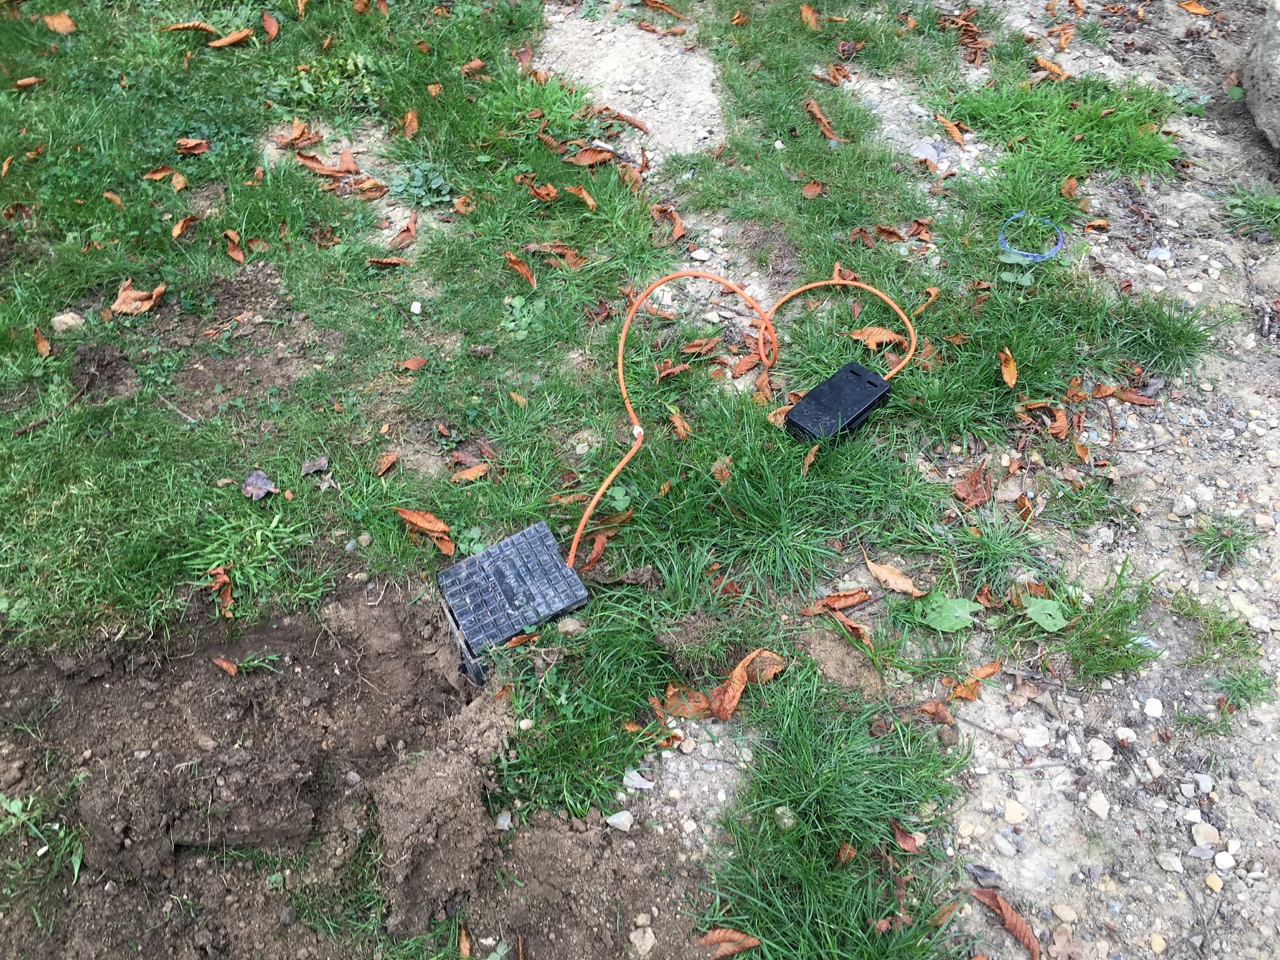
To begin with, we started at the Gigaclear junction ‘pot’ that had been placed on our boundary verge by the road:
Inside, you will find a smaller black box that contains the actual connection point:
Inside the small black box, you will find this:
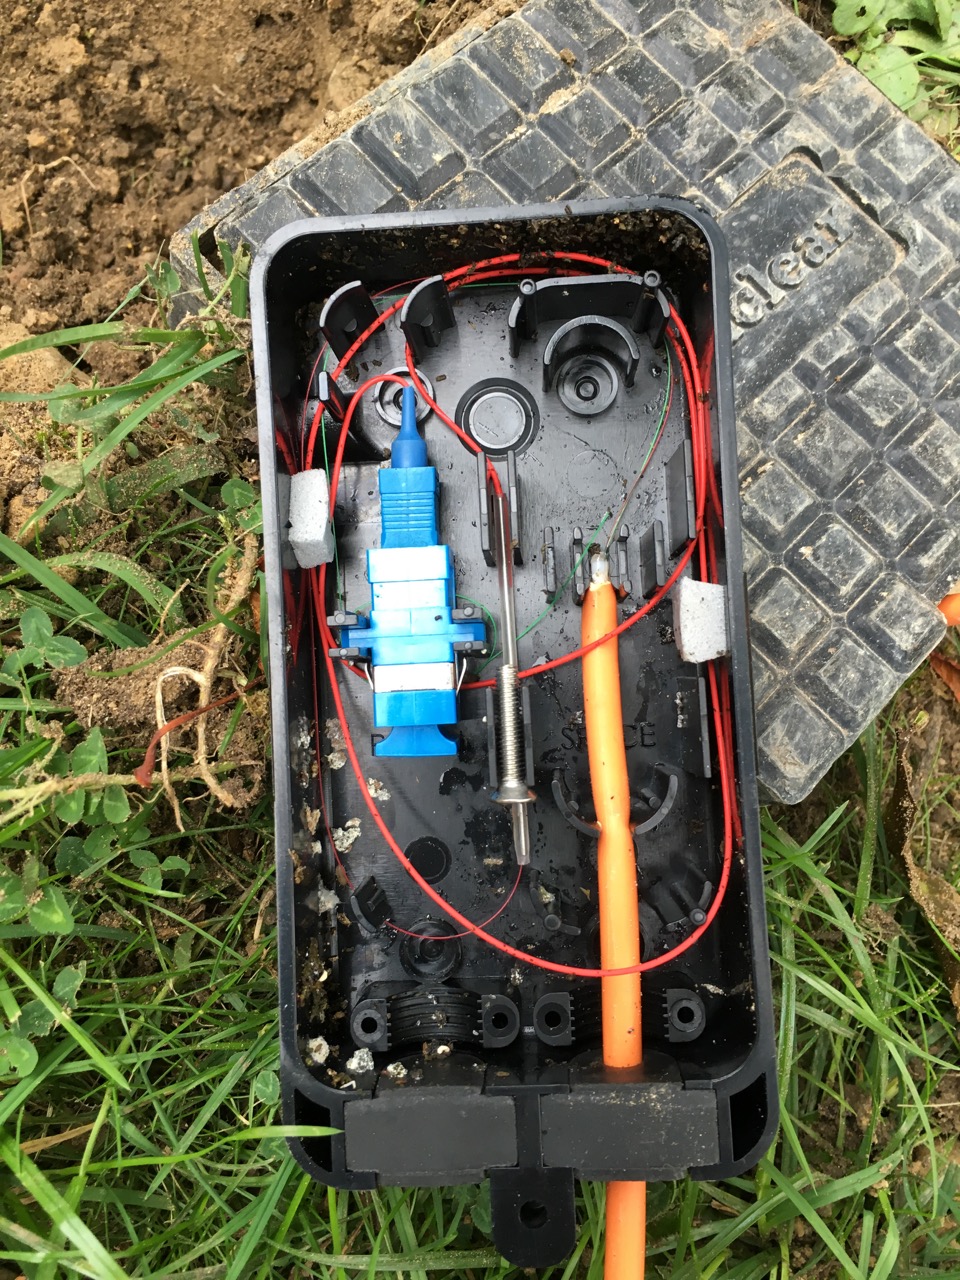 Unfortunately when I opened up the black box, it hadn’t been closed properly, and a slug family had decided to move in. I washed both the box and the lid as best as I could, but you can still see some of the remains in the picture! The lid of the box has a rubber seal that fits tightly against the junction box, and the cable entry points have rubber grommets to prevent water (and slug) ingress. Finally a screw is provided to tighten it together.
Inside the junction box, it looks like there may actually be 2 ‘fibres’ in the orange cable. If you look closely there appears to be both a red and green cable coming out of it. It just shows how thin these fibre cables really are once you strip away all of the insulation (and even these cables have a very thin layer of insulation on). Underneath the screw in the picture, there is a long tube – this is where the fibre cable from the ground is spliced to the cable that goes to the blue connector. You then get the thicker red fibre going into the connector, ready for a customer to plug into.
The connector appears to be the ‘SC’ standard. It clipped pretty easily into the one in the junction box.

Connector on end of supplied fibre cable
We started by digging a trench from the box to our boundary wall. The Gigaclear ground ‘pot’ has a hole around 2 inches deep behind the hinge, that allows you to feed the cable through. To protect the cable, we placed it inside some hosepipe tubing for the short distance that it was underground. Once at our wall, we drilled a hole through it, and then the rest of the journey we actually just clipped the cable to the back of the wall with the provided cable clips. Digging through hard earth and gravel is extremely difficult without power tools. Plus, the cable is probably safer above ground level in the event of any digging work being done in the future.
Interestingly, I ordered 50M expecting to only use around 30M of it. However, I ended up using almost the entire length of the cable! So I would definitely advise going longer than necessary – fibre isn’t like copper wire so the difference in length of say 25 vs 50 metres of cable doesn’t matter.
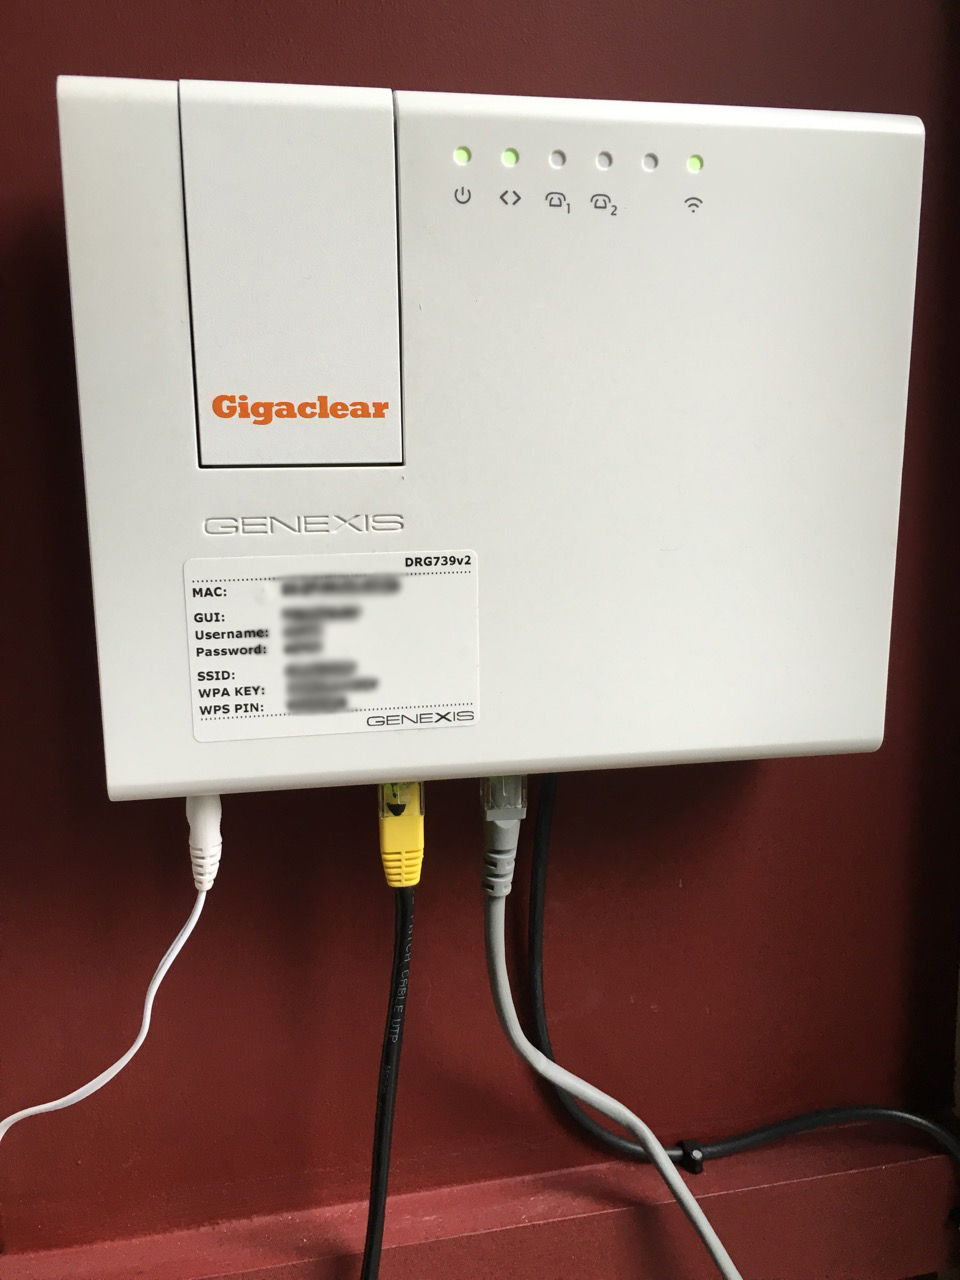
Getting the cable inside was easy, so was installing the ‘base plate’ that the router clips onto. The end of the fibre cable fits snugly inside the base unit, and the router literally slides up and makes contact with it. It was all pretty easy for anyone with basic DIY ability.
The finished router mounted on the wall:
With the installation finished, all that remained was logging on to the internet – you have to enter your address details and Gigaclear customer number first, and then it just worked.
Obligatory speed test result:
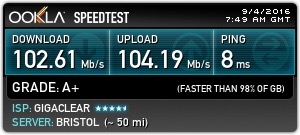
Pretty impressive! The low latency is probably the most impressive thing, since I’ve had experience of GPON installations elsewhere that had much higher latency. Gigaclear uses point-to-point fibre, not GPON, so you’re not sharing the fibre cable with anyone else (at least up until the cabinet, anyway).
It’s also worth noting that like many smaller FTTH providers, Gigaclear offers symmetric connection speeds on all of their plans. Even though BT offer FTTH plans in some places of the country, the upload speeds are not symmetric (I believe they offer a 330/30 service).
The supplied router is reasonable, certainly much better than Telefonica Movistar’s one provided in Spain for my FTTH there (it had extremely slow wifi). The Gigaclear router comes with 2×2 MIMO 802.11ac, obviously dual band 2.4/5Ghz. This is certainly reasonable, though really a 3×3 MIMO product would’ve been better, considering they do offer up to 1Gbps connections. It comes with 4 gigabit ethernet ports, as well as 2 telephone jacks (not used – unless the Vonage service uses them – I’m not actually sure).
The router interface is somewhat locked down: it lacks a few key features such as Dynamic DNS, bridging, and the ability for it to respond to ICMP packets externally. It’s adequate, but the power user in me would prefer something a bit more advanced. Sadly you have to use the provided router, and unlike Virgin Media, who allow you to bridge the connection to your own router, Gigaclear don’t offer this without having to pay for it (which is ridiculous – £4.17 per month).
If we consider the price of the connection, I would expect a few more options to be available without charging extra:
- A static IPv4 address without charging £2 per month for it. Also, this option is only available on the 200Mbps and 1Gbps packages (Why?). For reference, PlusNet charged me an £8 one-off fee for a static IP on their standard ADSL product.
- IPv6 support. Gigaclear claims to have built an ‘IPv6 capable’ network, but seem to have not found the ‘on’ switch yet. Sky broadband, who I am switching away from, offer IPv6 to pretty much all their customers, and BT are very soon rolling it out to their customers. Meanwhile most small ISPs have been offering IPv6 for much longer. It might not be important to many people, but it’s one of those things that should be standard on a ‘next generation’ internet connection.
- Bridging mode. This is only available to Business customers who then have to pay an additional monthly charge. Why? Virgin Media offer a bridging / router only mode to all of their customers by default, without charging for it. Surely this is a feature that could be enabled without any actual ongoing cost in the router interface itself?
Aside from these minor gripes, the connection is otherwise excellent. It does annoy me that I am downgrading my internet connection in some areas, whilst improving it in others. The lack of a dynamic DNS client built into the router is probably the most annoying of the problems. It just means I have to run a client on a computer all the time.
So would I recommend Gigaclear? The answer is absolutely yes. Despite some flaws that won’t effect 99% of people, it delivers a vastly superior connection compared to pretty much anything else out there at the moment.
Thank you so much for taking so much trouble in advising old codgers like myself how it is possible to link up the gizmo oneself.
Great article.We are about to be connected and the price and the restrictions regarding installation appear to be increasing by the minute. It seems difficult to get information over and above the company’s spiel. I think it would have helped if they had explained what should happen (and the costs) at the point of sale.
Installation isn’t too bad. Just set aside a weekend and then you’ll be up and running. It is worth it in the end!
Thank you for a clear and straight forward heads up. I’ll start with a 200 with static up and self done 50m from this.. My Thanks. MT. Newbury
Even though they don’t explicitly state it, ‘dynamic’ IP is in reality a static one. I’ve had the same IP address since installation, even though I don’t pay for a static IP.
Great appraisal 🙂 Very useful as I am about to do my own Gigaclear installation.
Thanks! Hope it went well.
Do Gigaclear allow bridging mode on residential connections now? They’re coming to where I live and I really would want this.
No bridging. Only DMZ.
Thank you very much for the instructions. Do you have any guidance / pictures going across lawn, gravel tracks, walls etc. I have about 30 metres to go across lawn / gravel, then behind drain pipe and through wall to attic. I am intending to put this in old hose pipe running along side of garden a foot down but not sure about behind pipe. Guidance pictures much appreciated.
Digging through lawn and gravel is much, much harder than you think – get some power tools! We found going above ground around a wall and pinning it discretely was much easier.
We used plastic conduit for the straight runs (both in the ground and along & up the house wall), aluminium scaffolding for under a driveway and through a drystone wall, and old hosepipe for corners and behind the drainpipe Hope this helps. Oh and take photos/make notes of where you buried it!
Such a brilliant and helpful reverie l review, thank you! We’re getting gigaclear FTTH in the next few months and it’s so useful to know what to expect.
How have you found the routers wifi capabilities? I am trying to work out where to place mine and wondered whether you get decent coverage through your property or whether you have dead spots to deal with.
I haven’t really tested the wifi too much, since I already have a separate access point – so I can’t comment on it’s range.
I’m gettting Gigaclear soon as part of the Fastershire rollout here in Gloucestershire – it’s very exciting when originally it seemed like even FTTC was a pipe dream! Thanks for posting, really interesting to read about the installation.
I really want to know if the Gigaclear router supports turning off DHCP? I have a home server that usually handles it and, while having to use the supplied router isn’t too bad, it would be a pain for me if I had to have it handle DHCP.
Yes, you can disable the built-in DHCP server.
That’s absolutely brilliant news! Thanks for replying too (I couldn’t find this information anywhere). Now looking forward to Gigaclear knowing that it will bring vastly faster speeds but only require minimal changes to my current setup.
I hate the supplied router, most times after rebooting it, it comes back up on some random IP and subnetmask. I have to hard reset and re-apply all my setting changes (manualy) there is no save settings in the UI or restore setting. The whole thing is locked down. No firewall settings, network admin features, so you cant restrict access to devices at source, only through crapy third party online software, which we all know is pants and any 6 year old can get round.
Wishing i could use it in bridge mode, not allowed and even on business contract they want 5£ a month for you to use your own firewall.
Don’t like the way they can just login too my network and see whats attached, who knows what else they can do?
Ho do you know they can login into the router, have they stated this? Even more reason to put another router behind it
Yes, I did know that. It did actually turn out to be useful once, since my router locked up when I wasn’t at home, and they were able to reboot it remotely. Are you sure your upload issue isn’t a wi-fi one? Have you tried direct ethernet? I am also double NATing with a DMZ and not getting any upload speed issues.
Does it allow you to switch off the the built in wifi and use an attached access point connected via ethernet to use the access points wifi?
Any thoughts on wifi range of the supplied box?
Forgive my ignorance here but how do Gigaclear and BT compare? I would love to ditch BT but their Broadband is actually quite good! Would I still need a BT phone line with Gigaclear?
Their present communication is very ambiguous and not very helpful to those of us who are less than familiar with this whole area!
Cables currently being installed in our village.
Latest update on Gigagclear. Self install all went well with dig across lawn (very hard) up to the attaic where there is data cabinet.
I am now experiencing a significant issue with upload Intenert>>DRG700>>UnifiUSG>>UnifyUSW>>UNifiAp. The DRG700 really is a brick with very limited functionality (doesnt even have ping capability). I have placed the USG as DMZ off the the DRG700 and am getting 93 download (good) and 8-23 upload (bad). After extensive test I have asked about geeting bridge mode enabled to prove that this is a double NAT issue, in the meantime done packet capture analysis to look at this in greater detail.
Did you get anywhere with this? This is the same setup I’ll have when GC arrives in the next few months.
Likewise for me. Did you manage to get bridge mode enabled or sort out a double NAT issue?
Gigaclear are currently installing fibre in this area. I currently have a BT internet connection to my office with Ethernet cable to my house next door allowing me to use 1 connection for 2 properties. Will I still be able to do this with a gigaclear connection?
Yes, you should be able to. Once you’re on the LAN side of the network you can do what you like. The Ethernet cable to your house will still work if plugged into the Gigaclear router LAN side.
Many thanks, should be better than the 2 meg we get now
I’ve just had Gigaclear installed…the core service is great BUT i am unable to set up the Heatmiser WiFi thermostat i have..I have some basic knowledge and managed to set the device up about 5 years with BT Router etc…Allocate a fixed IP, open a port, and then assign dynamic DNS so the internet connected App iahve can find the router and thermostat – however reading above the GGC router has not Dynamic DNS settings…Am i stuck..? Do you have guidance on how i might make it work again?
The GC router does not have a Dynamic DNS client, sadly. However, I have found that Gigaclear seem to assign a static IP (pretty much) even if you don’t explicitly pay for it. Find out your external IP using a site such as https://www.whatismyip.com and then use that instead of your dynamic dns hostname.
The alternative, if your IP does change, is to run the dynamic dns client on a PC and leave it running all the time.
Hi, Thanks for posting this. What happened if there were properties on both sides of the road? Did Gigaclear install to both sides? Has the Gigaclear cost changed at all?
Gigaclear will install to each unique property boundary, in general. They leave a small black ‘pot’ similar to the one your water meter lives in.
As a residential customer, can I pay extra for bridge mode or only business can do so? Is the provided router good enough for a heavy user (many downloads, streaming, gaming, all at the same time)?
You need the business packages to enable bridging.
The provided router is OK – I haven’t had any major issues with it.
Hi – great review, thank you. Do you have the ability to open up and/or forward specific ports to local network devices? Any port mapping from one port to another during this process?
Thanks,
You can do port forwarding, yes. I am not sure about port re-mapping from external to internal ports, since I am using a DMZ.
Nice write up. I have install booked for next week. I suspect I will be double NATing given the reports ‘re the GGC routers.
Has anyone access to the Router settings required to link to the GigaClear router in Bridge mode. To date, their support suggest that it should just plug-in and work, but I am expecting some specific IP address details etc, as you get with a BT supplied fibre service with their standard Cisco Router
See replies all above, Gigaclear ar refusingto put in Bridge mode. I have noticed that after a while (and some power cuts) the router becomes a brick, unable to ping, use wireless on it. Have to reset to factory defaults and start again
Yes. It is automatic – providing your own router WAN config is set as a DHCP client( ie get IP address automatically).
Once Gigaclear have enabled bridging mode, reboot the Gigaclear router.
Your own router should then take the correct WAN IP address.
I have used Draytek v2830 and v2860 routers on Gigaclear bridging mode with no problem.
Installed Gigaclear a few feels ago, easy enough job and very happy with the speed. Getting exactly 100 up and down as per the 100 package I’ve got, £10 a month cheaper than BT too.
As others have mentioned the router provided is pretty limited. Spoken to Gigaclear support and “using your own router is not possible”. As far as I can see it’s just a UPC/SC connector, does any one know what’s actually stopping you using your own router?
I had to cancel my gigaclear order in the end. They have pushed the network build date back from February this year to January 2019! At the same time I became able to order Openreach’s WBC FTTP product – ok, it’s not as fast, but the Router is pretty impressive.
It’s a shame that Gigaclear haven’t sorted out the router issue. They should provide customers with a choice to use Gigaclear’s system or an alternative ONT that just provides a PPPoE connection to a customers own provided router.
Hopefully in 18 months when my BT contract is up I might be able to order the Gigaclear product with a decent router!
Gigaclear installed their network in our village about 2 years ago and I resisted connection mostly because their charges are quite high especially considering the £100 connection fee.
A few weeks ago we received an invite to get free connection and installation ( they don’t offer the self install kit anymore) with 300mbit for £35 / month for 18 months (after that you revert to £45 or you can drop down to 30meg for £35).
The installation was completed about 10 days after ordering.
They install a rigid plastic tube about 10mm dia which has about 3mm dia hole, so very thick walled and tough. They blow a fiber through and connect to an externally mounted junction box which then has a short patch cable through the wall to the router.
My installation took about 3 hours and was left very tidy, you can’t see where they dug up!
Everything works fine although the WiFi coverage of their router is poor (seems a common complaint).
I have installed a cat6 ethernet cable to a second router ( from an old ISP) and am using that as a switch/access point to provide WiFi elsewhere ( very simple to do by turning off DHCP and changing the default up address in the second router to one outside the gigaclear DHCP range).
I have Gigaclear and live in an old farmhouse with thick walls and spread over three floors so lots of black spots. I tried using a solwise ringmain booster which helped a bit but I am told that a network is the way to go. Can anyone recommend a make and model ?
Thanks
Graham I hope I’m not teaching you to suck eggs but a network is fundamentally an ethernet cable connection in all the rooms where you want a good broadband connection and originating from your router/modem. You can then plug your Computer, TV and wireless access points directly into your own network (known as a local area network or LAN) without losing signal strength. But and there is always one of those isn’t there, I assume, due to your post date that you have the latest Lynksys Velop system in which case your router/modem only has one useable port which must be connected to the first Velop wireless access node so you will have to run an Ethernet/patch lead from the Velop node (it has 2 ports on the base) back to an ethernet switch into which you can then plug all of your hardwired cables.
The connection sequence is MODEM ➡ VELOP NODE ➡ SWITCH ➡ EQUIPMENT.(TV, computers, additional Velop wireless nodes, etc.
I have just wired my house with 9 Ethernet outlet’s in various rooms because all my walls are solid and wireless is not much good in most areas. Some rooms have 2 outlets so that I can connect straight to a TV and also to a wireless node for tablets or phones, etc. Luckily I was able to drop the cable down the cavity so have no cables showing. Took me a few days on and off but I’m retired, in my mid 70’s and every day is Sunday, plus like most people during these unprecedented times I haven’t exactly been out clubbing every night.
Having said all of the above I have assumed you have one of the Smart WIFI packages using the supplied Velop nodes! If not then the wiring sequence might be different as your router/modem may have more useable ports thus negating the need for a switch!
Take care and remember 6 feet apart is better than 6 feet under.